Download and install the latest TWRP 3.1.1 recovery on Samsung Galaxy J5. By following this easy step by step guide, anyone can install the latest TWRP recovery on a Samsung Galaxy device. The new TWRP 3.1.1 offered many more new customization features than the previous releases. All the awesome features and custom options that coming with this latest TWRP version is given later part of this guide. This guide is round on galaxy j5 especially.

Before going to download and install the recovery, you should know why we need custom recovery over stock recovery. Do you know the benefits of having a custom recovery on your android phone? The stock recovery has limited options and has many limitations regarding device backup, software updates, and others. But with a custom Recovery installed like TWRP, you’ll have more advanced customization options such as- backup and restore full system, flashing custom ROM, flashing custom kernel’s, clear Dalvik cache, remove bloatware apps or default apps, install .zip files from other sources, gaining root access, do an android backup, overclocking CPU frequencies and many more.
Page Navigation
What is TWRP Custom Recovery?
TWRP is an open-source, community project, developed by TeamWin. Team Win was originally formed to work on porting WiMAX to CM7 for the HTC EVO 4G. After that start working on a recovery project that supports more and more devices. Today TWRP is the most dominating custom recovery for Android phones.

TWRP 3.1.1 New Features:
- Backups will now include adopted storage keys (Dees_Troy)
- Fixed an ADB restore issue (big biff)
- Fixed rebooting when no OS is present (Dees_Troy)
- Fixed line wrapping in the GUI terminal (that)
- Updated TWRP source code to AOSP 7.1.2 Updated TWRP source code to AOSP 7.1.2
Important Notes: About TWRP
- This TWRP Recovery file is only for the Samsung Galaxy J5 SM-J500H model and not for any other android device.
- Do not use this method to install custom recovery in any other android phone, you may hard brick your device.
- This TWRP Recovery tutorial is only for unlocked Samsung Galaxy J5 SM-J500H. Please don’t try this on any other variant of the smartphone.
- You should do it at your own risk, we are not responsible if anything happens to your device after following this guide.
- The tutorials are based on Windows PC.
Requirements:- For TWRP Recovery Installation on Samsung j5
-
- Check your device battery power, at least 50% battery backup is required.
- Backup or copy important data (photos, videos, notes) and settings to external storage (It’s optional but taking backup is always a good practice].
- Install USB driver on your PC/Laptop- Download USB Driver.
- Turn on the USB Debugging inside the Developer Options. Go to Settings-Developer Options [Developer options are hidden by default on all Android devices running on Android 4.2 or up. So, to unhide it, go to Settings-About phone on your device and tap Build Number for 7 times) See the image below.
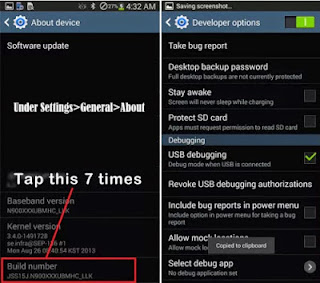
All the above pre-requisites are very important and must be followed before proceed to the installation guide. If you are done with all the above instructions, then follow the steps to install TWRP 3.1.1 on Samsung Galaxy J5 SM-J500H.
TWRP 3.1.1 Custom Recovery for Samsung Galaxy J5
- Download TWRP 3.1.1 for Galaxy J5 SM-J500H- Download (TWRP-3.1.1-1-j53gxx.img.tar).
- Download latest Odin software for your PC/Laptop- Download Odin
- Now switch off your phone and press and hold the Volume Down+Home+Power buttons together to boot into Download Mode (long press until a warning screen appear)
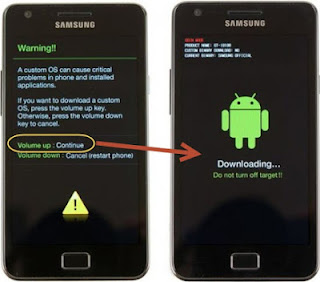
- Now run the Odin application file as an administrator (Right-click on the .exe file and click on Run as administrator)
- Now connect your Galaxy J5 SM-J500H to your computer via USB cable
- In the Odin screen, you should see a COM Port number like “0:[COM4]” at ID: COM section at the top left side and “Added!” text at the log box. It means your Android device has been successfully detected by the Odin tool.
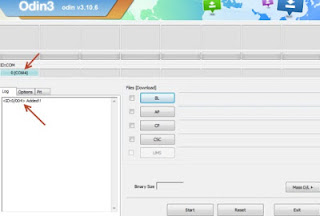
- In Odin screen, under the Options tab, make sure that only the “Auto Reboot” and “F. Reset Time” options are checked, make sure other options are unchecked Auto Reboot F Reset Time in Odin
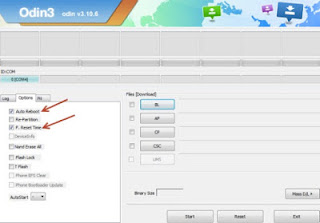
- Now, click on the AP button and select the downloaded .tar TWRP file AP button in the Odin screen
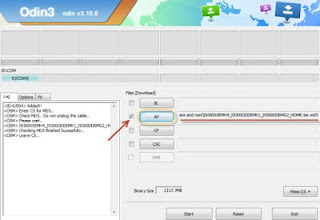
- Finally, click on the Start button to begin the installation process, wait a few moments, it may take approximately 3 to 5 minutes to complete.
- Once completed, you would see “PASS!” message in ID: COM port having green background Pass in Odin

- Your device should automatically reboot after completion
- Now You can disconnect your phone from PC/Laptop by removing the USB cable
- Now, to boot into recovery mode- first, switch off your Android device. Now press and hold the Volume Up+Home+Power button together for few seconds until the Samsung logo appears. Soon the device will boot into recovery mode.
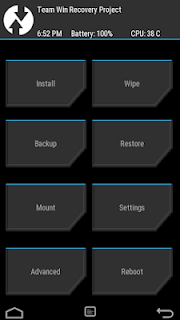
- Now you can go back to your normal Samsung Galaxy J5 SM-J500H smartphone mode by selecting “reboot system now” from the recovery menu. The smartphone will boot to normal mode.
Install TWRP 3.1.1 using TWRP Manager:
- Install TWRP Manager from Google play store – check out
- After installation, open the app and grant root permission.
- Find Advanced option, then Install TWRP Recovery on your device
- Select your device and tap on Install Recovery

That’s it. Use any of the above methods to install TWRP 3.1.1 on Samsung Galaxy J5 SM-J500H. After installation, you can always boot into the custom recovery mode by pressing and holding the Volume Up, Home, and Power button together (while your smartphone is on switch off mode). For any query feel free to contact us or mention in comment.
Related Articles
This section always helps you to install TWRP on your device. The main behind adding this section is giving more knowledge about the TWRP installation for this specific manufacturer. Below a list of Samsung devices with the installation method of TWRP.

