Hey galaxy lover,
Welcome back to an excellent guide on installing twrp recovery. In this article, we’ll guide the complete step by step guide to install twrp recovery on galaxy a11 android device.
As we know, Samsung has millions of users. And Galaxy a11 is the most favorite device of many galaxy users.
By reading old comments, we noticed that galaxy users are more courageous about rooting and installing custom ROMs and new applications. Indirectly they want more customization with their device.
So here’s come twrp recovery and different kinds of custom ROM, which gives complete authority to the user.
By root galaxy a11 device or installing twrp recovery, galaxy users can do a lot of customization. Being an average user, it’s not imaginable. Once you’ve knowledge of twrp recovery and its benefits, then believe us you’ll be excited to install recovery on your A11 device. Sounds good!
Now coming to the benefits of twrp recovery. This will give you a complete overview of how twrp will change your android experience.
NOTE – Installing the Process of TWRP is always Risky. Make sure you have complete information about TWRP. TWRPUPDATE and its author, none would be responsible for any loss. Do at your own risk.
Page Navigation
What is TWRP?
TWRP stands for the ‘TeamWin Recovery Project‘. It’s open-source software. It gives the touchscreen interface to install recovery files. You can also take the complete backup of your current stock memory.
Benefits Of TWRP Recovery On Galaxy A11
We’re discussing only the significant pros of twrp recovery on a11. Once you install recovery on your galaxy device. Your android experience will enhance like crazy. Isn’t it incredible!
Coming to the point, TWRP will change your device completely. Like you can Root Galaxy A11 device, Install custom ROM On Galaxy A11 and do a lot of customization.
Demerits Of TWRP Recovery On Galaxy A11
Rooting will not harm your galaxy device directly. But it’s hurt you here’s how?
It’ll void the galaxy A11 warranty. That means you’re not permitted to go to customer care services for device problems. Because once you root your galaxy device, your device’s official warranty will be lost.
But the good thing is, you can bring back the warranty by unrooting your device.
Now coming to the next, major disadvantage of installing the recovery. If you install the wrong twrp file, then the device will brick. So be careful while installing the recovery.
Rooting and installing twrp recovery almost have the same cons. So don’t confuse.
Guide To Root Samsung Galaxy A11
Before implementing the rooting steps make sure you know about the important steps.
Vital Steps
The first important thing is, Enable developer options and Unlock OEM. The next step, make sure you have device backup.
Now unlock Galaxy A11 bootloader, because without unlocking bootloader you can install recovery and can’t root your device.
Charge device battery at least 50-60%.
These critical steps are the same for both the recovery process, as well as the rooting process.
Steps To Root Galaxy A11
Follow these steps to Root –
- The first thing is you have to Download the latest magisk zip for Galaxy A11.
- Switch off your Samsung device and boot into the recovery mode
- Now Press and hold volume up + Power button and don’t leave until you see the boot logo. And always note down, don’t release the volume up buttons until the TWRP mode open in the device.
- Install and select the downloaded zip file.
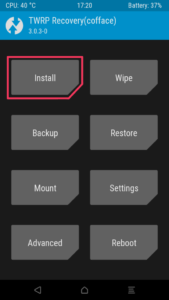
- Tap on the “Swipe To Confirm Flash” button
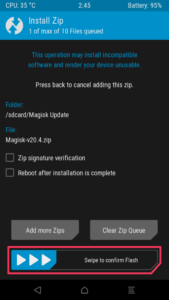
Congratulations! You successfully root the Samsung Galaxy A11 device. This method won’t require any PC to root galaxy device. This is the most recommended method to root easily any android device.
Check out an article to install custom ROM on galaxy a11 android device.
Guide To Install TWRP Recovery On Galaxy A11
Vital Steps
The first important thing is, Enable developer options and Unlock OEM. The next step, make sure you have device backup.
Now unlock Galaxy A11 bootloader, because without unlocking bootloader you can install recovery and can’t root your device.
Make sure you have a PC/Laptop To perform this action.
Steps To Root Samsung Galaxy A11
Here’s the step by step process for root –
- Download Odin Flash tool for Samsung Devices, And Extract it on your PC
- Now you Have to Download TWRP for your Samsung Device from Here.
- Now Boot Samsung Galaxy A11 in fastboot Mode.
- To Boot Samsung Galaxy A11 in fastboot Mode, you have to Turn Off then Press and Hold Bixby + Volume Up + Power key.
- Now you have to Boot Galaxy A11 in Download Mode, do that, turn it off and Press and hold Bixby + Volume Down button together to turn on the phone. Now press Up Screen to boot in Download Mode.
- Connect your Smartphone to Computer using the USB port
- Now Open Odin in Your PC
- Now ID: COM tab on your Odin will turn Blue which means your phone is successfully recognized by the Odin flash tool If it doesn’t reconnect your Device and check again.
- Now tap on the AP button on the Odin Tool and Select TWRP recovery for Samsung Galaxy A11 you downloaded earlier.
- Now Tap on Start Button
- Sometime you will see the “PASS” Button on Screen which means TWRP recovery is successfully installed on your android device
- Now, implement this step-by-step guide for your galaxy a11 Device to get success.
Hope you successfully install twrp recovery by using odin flash tool. If not then don’t worry. Below the twrp application method to install recovery on your Galaxy A11.
Guide to Install TWRP Recovery On Samsung Galaxy Via TWRP Application
This is the twrp application method to install recovery on your Galaxy A11 device. Make sure you follow every step –
Steps To Install TWRP On Galaxy A11
- First, Download TWRP Application from play store – Check out
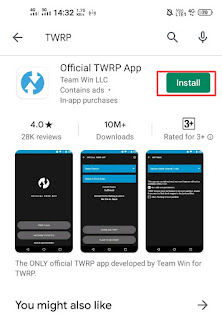
- Next, Install App and accept Terms and Conditions.
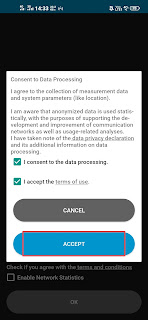
- Now Tap the Option Run With Root Permission.
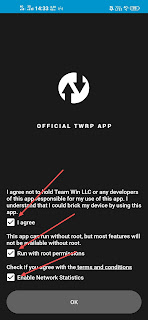
- Next Select TWRP Flash Option and accept their conditions.

- Find your device or You can search your device by using search bar.
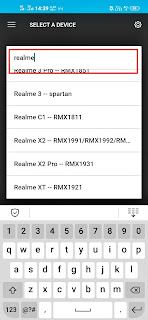
If Your Device Is Not Appear In The List. Then Don’t Go For Next Step. Wait for your official TWRP file. If you get your device file then follow the below step.
- Download the TWRP image file for your Samsung Galaxy Device and save that file in the ROM (Internal Storage).
- Now Go Back To The Application and Tap on ” Select a File To Flash “.

- Now Find And select the TWRP image of your device.
- Select “Flash to Recovery” and then tap on Confirm.
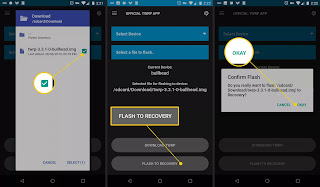 Everything is perfect; soon, the process will complete in a couple of seconds. You have successfully installed the TWRP Recovery image file in your Samsung Galaxy A11 Device.
Conclusion
We hope you successfully install twrp recovery on your galaxy device. Whether recovery installation gives you a lot of benefits, it has it’s side effects. Don’t ignore the negative views about twrp recovery and rooting Devices.
Just follow the above mention steps and install recovery carefully.
Still, you have any kind of issue you can dm us on Twitter or comment below. Our team will reply as soon as possible.
FAQ (Frequently Asked Questions)
Can I Install TWRP Recovery On Samsung Galaxy A11 Without PC?
Yes, You can install twrp recovery without pc via twrp official application. But it requires root access of your device.
Can I Install Custom ROM On Samsung Galaxy A11 Device?
Once your Root Galaxy A11 device, then you can install any compaitable ROM on your Galaxy device. TWRP recovery also gives you the authority to install custom ROM on Galaxy A1q android device.
Is Root Access necessary before installing twrp recovery?
No, you can install twrp recovery on galaxy a11 without rooting device. But you have to use pc method for installing Recovery.