Hey Guys! Welcome back to another how-to guide. In this article, I’m going to guide you on how to install TWRP Recovery On Samsung Galaxy A50. No doubt on the entire internet there are a lot of methods available to install TWRP. Believe me, most methods are useless for a newbie. I don’t recommend a newbie to use a complex method. So here we guide you to install TWRP via 3 different methods.
Page Navigation
Key Features Of Samsung Galaxy A50
Here we discuss only a few but the important specifications of this Samsung device. Because this site’s main motive to guide you to the installation process. So without wasting your valuable time. Let’s jump on the device key features.
| Display | 6.4 inches, 100.5 cm2, Super AMOLED capacitive touchscreen |
| Performance | AnTuTu: 144574 (v7)GeekBench: 5396 (v4.4)GFXBench: 8fps (ES 3.1 onscreen) |
| Battery | Non-removable Li-Po 4000 mAh battery, Fast Charging 15W |
| Memory | microSDXC(dedicated slot) , 64GB 4GB RAM, 64GB 6GB RAM, 128GB 4GB RAM, 128GB 6GB RAM |
| Camera | 25 MP, f/1.7, 26mm (wide), PDAF8 MP, f/2.2, 13mm (ultrawide), 1/4.0″, 1.12µm5 MP, f/2.2, (depth) |
| Selfie Camera | 25 MP, f/2.0, 25mm (wide), 1/2.8″, 0.9µm |
| Sensors | Fingerprint (under display, optical), accelerometer, gyro, proximity, compass |
| OS / Chipset /CPU /GPU | Android 9.0 (Pie), upgradable to Android 10, One UI 2.0, / Exynos 9610 / Octa-core (4×2.3 GHz Cortex-A73 & 4×1.7 GHz Cortex-A53) / Mali-G72 MP3 |
What Is TWRP Recovery?
TWRP stands for TeamWin Recovery Projects. It helps you to customize your android device. In other words, TWRP gives you complete access to use your android device. TWRP has its own pros and cons. Let me explain one by one. Are you excited to know more about TWRP then drop down your comment below?
Pre-Requirements For Installing TWRP On Samsung Galaxy A50
Here we’re going to mention some important points which you have to implement before installing TWRP Recovery on Samsung Device. Are you excited to know about it? Let’s start

Pros Of Installing TWRP On Samsung Galaxy A50
Before install TWRP let’s take some information about the merits of TWRP. it gives you a lot of benefits. Are you excited to know more let’s go to the merits section –
Cons Of Installing TWRP On Samsung Galaxy A50
As I mention above TWRP contains a lot of negative points but don’t worry not every point will harm your device, but some points can. So let’s discuss TWRP demerits.
Guide To Install TWRP Recovery On Samsung Galaxy A50
Installing Process of TWRP of every device is different so don’t use one method with ever smartphone. The method which I’m going to show below is applicable to every Samsung Device so don’t worry you can use this exact same method for any Samsung device. Are you guys ready let’s play with TWRP official application.
- First, Download TWRP Application from play store –
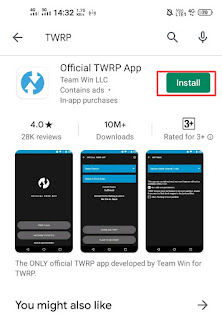
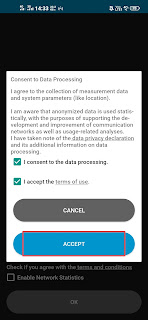
- Install the App and accept Terms and Conditions
- Click the Option Run With Root Permission
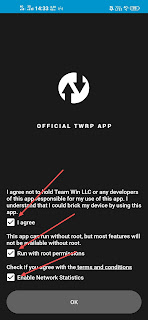
- Tap on TWRP Flash Option and accept their conditions

- Find your device or You can search your device by using search bar
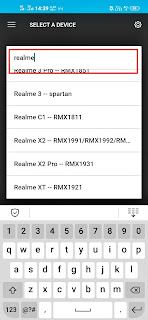
- Download the TWRP image file for your Samsung Device and save that file in the ROM (Internal Storage)
- Go Back To The Application and Tap on ” Select a File To Flash “

- Find And select the TWRP image of your device
- Select “Flash to Recovery” and then tap on Confirm
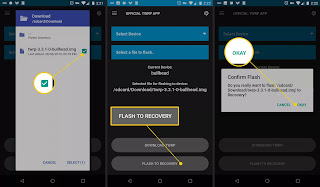 All Done! ? You have successfully installed TWRP Recovery on your Samsung Galaxy A50 device. This method won’t require any PC/Laptop to install TWRP on your Samsung device. If this guide helps you then drop down yes in the comment section. If you want more information about this topic then make sure you check out the XDA-Developer website – https://forum.xda-developers.com/galaxy-a50/development/recovery-twrp-galaxy-a50-t3916199 On the other hand, below we’re going to guide you another method to install TWRP on your Samsung device.
Video – Install TWRP Recovery On Samsung Galaxy A50
In case you don’t understand the below mention methods. Watch this video and understand a better way. This video is in Hindi so you can watch the steps for avoiding the language?.
Guide To Install TWRP On Samsung Galaxy A50 Via Flashify App
For the first time we included the flashify method to install TWRP Recovery. It’s likely as a TWRP application method to install TWRP. So without wasting time let’s start installing process –


Guide to Install TWRP Recovery On Samsung Galaxy A50 With PC
This method requires a PC/Laptop to Install TWRP on Samsung Device. If you don’t have a PC then use the above method to install Without PC.
- Download Odin Flash tool for Samsung Device, And Extract it on your PC
- Now you Have to Download TWRP for your Samsung Device from Here
- Next Boot Samsung Galaxy A50 in fastboot Mode
- To Boot Samsung Galaxy A50 in fastboot Mode you have to Turn Off then Press and
Hold Bixby + Volume Up + Power key
- Now you have to Boot Galaxy A50 in Download Mode, do that, turn it off and Press and hold Bixby + Volume Down button together to turn on the phone. Now press Up Screen to boot in Download Mode
- Connect your Smartphone to Computer using the USB port
- Now Open Odin in Your PC
- Now ID: COM tab on your Odin will turn Blue which means your phone is successfully recognized by Odin flash tool If it doesn’t reconnect your Device and check again.
- Now tap on AP button on the Odin Tool and Select TWRP recovery for Samsung Galaxy A50 you downloaded Before
- Now Tap on Start Button
- Sometime you will see “PASS” Button on Screen which means TWRP recovery is successfully installed on your Phone
That’s it, now everything is done & you do better with this guide. Congrats you successfully install TWRP custom recovery in Samsung Galaxy A50. Are you enjoying it?
Related Articles
So this article is completely dedicated to guiding you about how to install TWRP, so this related article section also contains the same type of articles. Here we added some Samsung device TWRP installation method.
Summary
We write this article to help you. We hope everything is going perfect. The above article contains, more than 2 methods, use anyone which you like. Most of the users prefer to use without PC/Laptop method because they are easy to use. I suggest you go with the official method of TWRP. Further, if you have any questions in your mind then let us know in the comment section. We’re waiting for your response. We’ll try to solve it as soon as time allows.

